How To Fix Water Damage On Wood
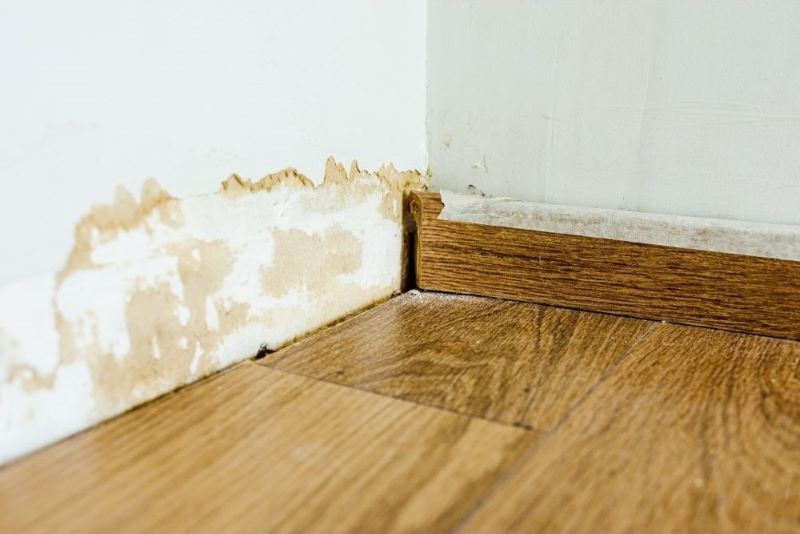
Although wood and water don’t mix well, this blog can help you know how to fix water damage on wood. Continue reading to find out all you need to know about fixing wood that has been damaged by water.
Guide On How To Fix Water Damage On Wood
Step #1: Let The Wood Dry
Bathing wood in the sun is the most common method of drying wood. All you have to do is place it in the sun and wait for the water to run off from the wood. Reducing moisture from wooden furnishings can also be achieved by wiping soaked wooden furnishings with a clean microfiber cloth.
However, after a while, you have to rotate the wood while using this method. The reason for this is that the wood dries out too quickly from continuous sun exposure, which leads to shrinkage, fractures, and warping.
Another way to remove moisture from wood furniture is to use electric fans. Place the furniture in a well-ventilated room with running electric fans lasting at least 24 hours.
To lower humidity, a dehumidifier can be put in the middle of the space once all the water has been drained.
Step # 2: Get Rid Of Any Wood That Is Rotting
Get rid of any soft or deformed dried wood. The wood cannot be saved if damage persists even after it has dried completely. You can either manually remove the wood or use a putty knife or chisel to remove or scrub off any dubious-looking wood. If the wood is brittle and mushy, wear away the worn wood using a drywall sanding brick or a piece of sandpaper.
If removing the wood would compromise the object’s structural integrity, try extending its life by using a wood preservative.
Step #3: Remove Water Stains
With the chosen product, remove the water stains. While darker stains could need more than one treatment, lighter stains might just need to be treated once.
Use harsher substances for deeper, darker stains. When you’re done, give the wood a thorough hand wipe and give it a full day to dry out.
Step #4: Remove The Wood’s Finish
To remove the finish, either sand the wood down or apply a chemical. You can skip this step if the wood isn’t finished. But now is the moment to remove any paint, varnish, or stains from your furniture.
For any kind of finish, sanding the wood’s surface is a viable alternative. Sanding should be replaced with denatured alcohol for shellac or lacquered wood. Use a chemical stripper for paint or polyurethane.
Step #5: Reapply Paint To Any Visible Stains
Proceed with the treatment and stripping procedure again if stains are still visible. You could still be able to notice water damage, depending on how deep the wood stain is. If you treat and strip the wood again after the finish has been removed, it might be easier to remove the stain.
It is completely optional to do this. If you want to paint or stain the wood regardless of whether the stain is mostly removed, it is likely alright.
Step #6: Seal Up Any Gaps Or Cracks
If you want to fill in any missing material, use auto-body filler. To prepare and mix it, adhere to the label’s directions. The filler should then be applied to any wood gaps or cracks. Work it into the opening with a gloved finger, or use a putty knife to smooth it into gouges in surfaces that are flatter.
The filler should be added continuously until the space is filled. Use the edge of your putty knife to smooth up any uneven filler. The filler should be level with the wood after you keep scrubbing the surface.
It is completely optional to do this. You have the option to disregard them if the damage doesn’t bother you or if you believe that it adds a little character.
Step #7: Sand The Wood
For smoothing the wood, use sandpaper or an orbital sander. Start with sandpaper with a rougher grit (220 grit) and gradually reduce it to a finer grit (100 grit). Until the wood is touch-smooth, sand along the grain repeatedly.
Furthermore, sanding can help fade the stain’s appearance by removing its surface layer.
Step #8: Re-Glue Loose Joints
Right now is the perfect moment to fix any unstable furniture. If the joint opens easily, take it out, put some wood glue on it, and then put the joint back together. Use clamps to press the pieces together if you have two parts that sit flush against one another after applying wood glue. Use wood glue and a paintbrush to smooth out the seam if the joint won’t separate.
Before moving further, give the glue a full day to dry. Don’t panic if the furniture is holding up just fine and the joint is only slightly out of joint.
Step #9: Paint Or Stain The Wood
Apply the finish of your choice, according to your unique taste. If you want the wood to look more natural, go for a wood stain; otherwise, paint it to give it a whole other look. Cover your wood with a dropcloth, then use a paint tray, brush, or roller to apply stain or paint. Let the wood dry completely before applying two to three more coats, or until the desired opacity is reached.
If you want to make sure everything looks uniform, stain and paint the entire piece or touch up any minor areas with paint or stain that closely matches the rest of the wood.
Step #10: Seal The Wood With A Varnish
Apply a layer of varnish to the paint or stain to prevent damage. Although varnish is not necessary, it will help to preserve the paint or stain you have applied. Even unfinished wood can be varnished to keep splinters away and protect your furniture. Using a paintbrush or roller, apply varnish all over the wood.
The most widely used type of varnish is undoubtedly polyurethane, but other oil-based finishes are primarily intended for floors. Natural resins are another option; they work similarly to varnish.
How To Take Care Of Wooden Furniture To Prevent Water Damage
After knowing how to fix water damage on wood, it is now time to learn how to take care of it. There are a few precautions you may take to prevent wood furniture from typical water damage:
- Avoid exposing wood furniture to direct sunlight
- Clean up spills right away
- Dust regularly
- If the weather is dry, use a humidifier
- Maintain an adequate level of humidity in your house, ideally between 30% and 50%
- Use a moist microfiber cloth to clean as needed; distilled white vinegar is a safe cleaning option.
- Under plants, place rugs or matting to collect drips
- When putting drinks on wooden surfaces, use coasters